While surfing the internet one afternoon, I came across this awesome idea – cupcakes decorated as owls. They are not only super cute but so easy to make too. I just had to share the idea.
They are great to make with the kids and perfect for Halloween, which is just around the corner so best start planning (I know I am).
I served my owl cupcakes at my husband, Garith’s birthday but you can make them for anything. I especially love the idea of a not so spooky, Halloween treat, that the kids can get involved with and you can enjoy eating!
These owl cupcakes are quick and easy to assemble and use simple ingredients. I have listed the ingredients and directions below for your convenience and also included a photos of mine. If you need any help or have a question, please just leave a comment and I will gladly assist.
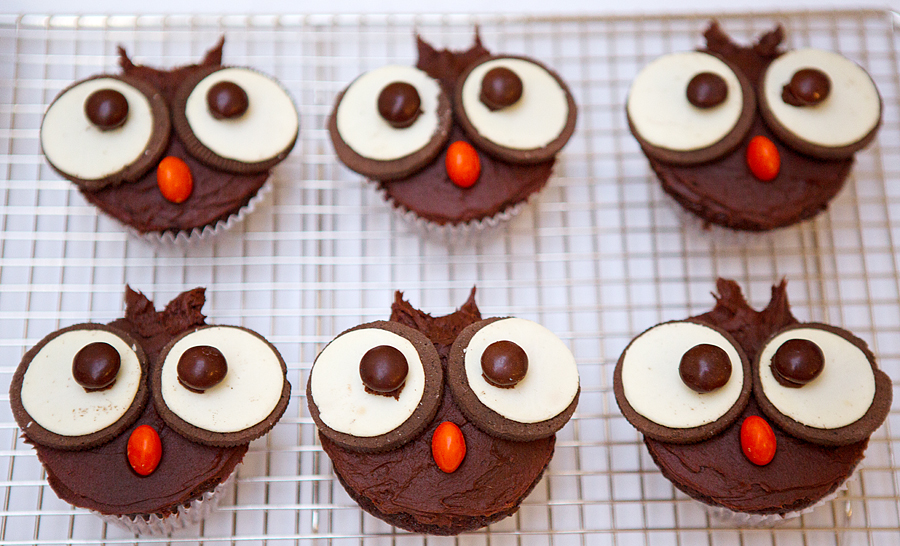
Chocolate owl decorated cupcakes
Ingredients:
- Baked chocolate cupcakes (recipe here)
- 1 package Oreo’s
- 1 box Reese’s Pieces or Smarties or M&M’s
- chocolate icing
- Knife
The steps are as follows :
- Ice the cupcakes with chocolate icing.
- Untwist two oreo’s to give you four half’s (hopefully all the icing in the middle will be on 2 sides). Use a butter knife to scrap any left over oreo off so you are left with nice white icing.
- Using some of the chocolate icing, carefully glue two brown Reese’s Pieces/Smarties/M&M’s onto the white part of the Oreo.
- Place the Oreo eyes onto the cupcake.
- Put an orange Reese’s Pieces/Smartie/M&M on its side in between the eyes to make the owl’s beak
- Swirl some owl eyebrows above the eyes, I used a butter knife
For more fun ideas like these, check out Brittany’s blog : One Charming Party
Related articles across the web


2 comments for “owl cupcakes – how to make”